Your cart is currently empty!
Free Shipping on all orders over $75!
Moleskine notebook turned planner
By
.
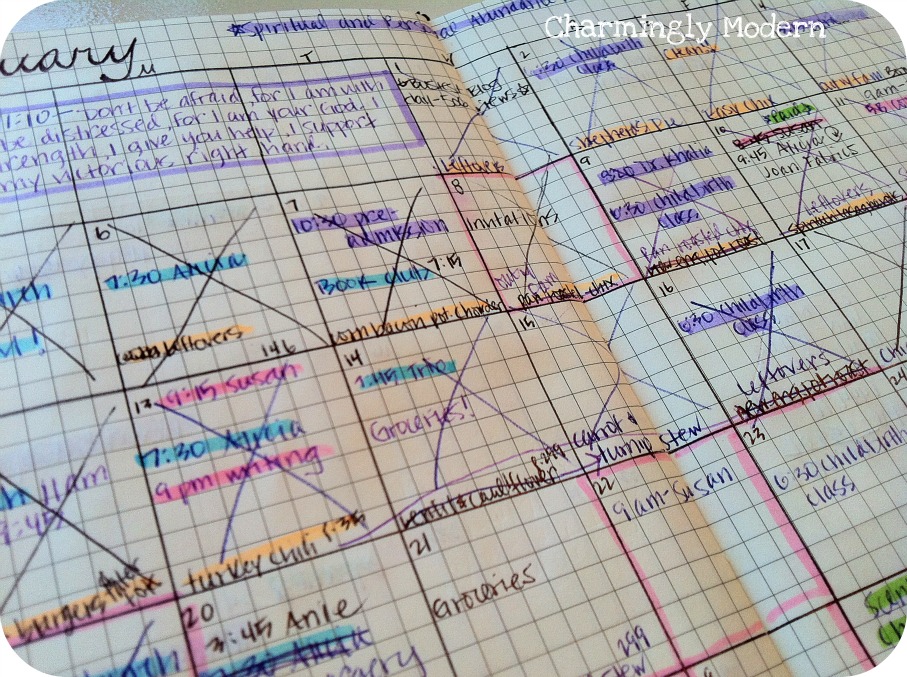
Several weeks ago, a post title in my Google Reader feed caught my eye: Moleskine Notebook Transformation – A No Binding Required Weekly Planner Tutorial, by Kyla Roma.
This caught my eye for a couple reasons:
- I had been searching for the perfect planner for approximately 1 month and I was tired of spending money on planners and finding out they just didn’t work for me.
- I didn’t feel like binding my own planner, like I did last year.
- It sounded super easy and fun
- I love Kyla Roma and anything she does
I used Kyla’s tutorial as a guide in the transformation of my own Moleskine, but I personalized it to my tastes. This project cost me $19.00 – the price of the notebook plus tax. It was a little time intensive (probably about 9 hours total) but that’s still less time than what it takes me to handbind a notebook.
I used a Moleskine Classic Large Squared notebook (hardback), in black. I wish other colors would have been available but I have plans on embellishing the cover so it’s no big deal.
I wanted the twelve months in addition to weekly pages. I also wanted blog planning pages, and plenty of space for lists, brainstorming, journaling and whatever else I may feel like scribbling.
For the monthly pages, I began three rows down from the top for the horizontal lines, and three rows up from the bottom to create a box. Each day of the month is a 7×7 square (7 cubes across, 7 cubes down). This will total to 5 weeks and plenty of space for long months (there are a few long months this year!).

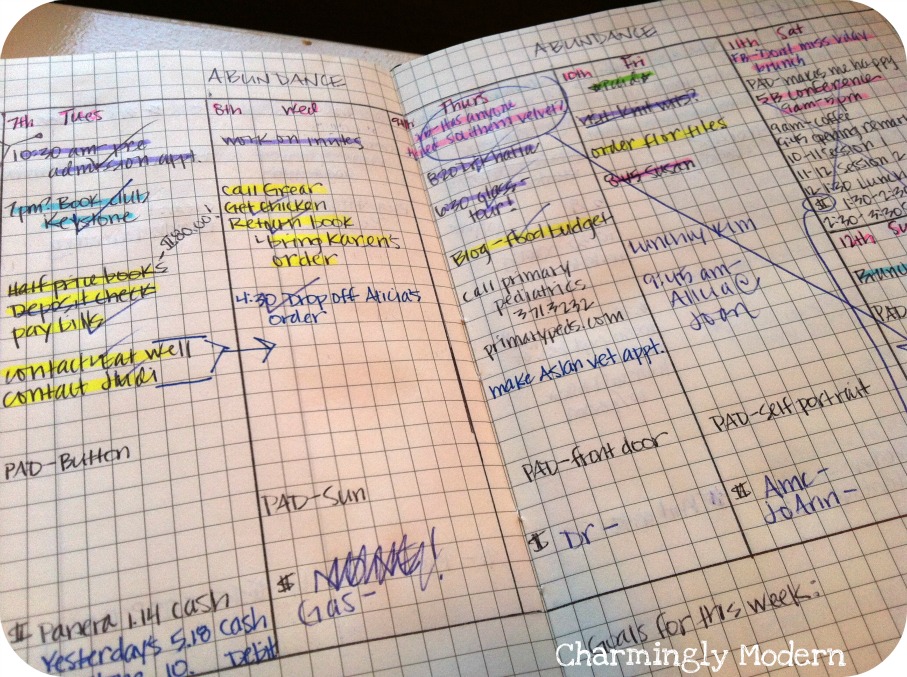
After completing a monthly page, I then began the weekly pages for that particular month. Again, I started three rows down from the top of the page for one long line across. Each day of the week is a column – 9 cubes across x 26 cubes down. The weekend is in column at the end, slightly smaller at 7 cubes across and 26 cubes down, but cut in half at the 13th cube.
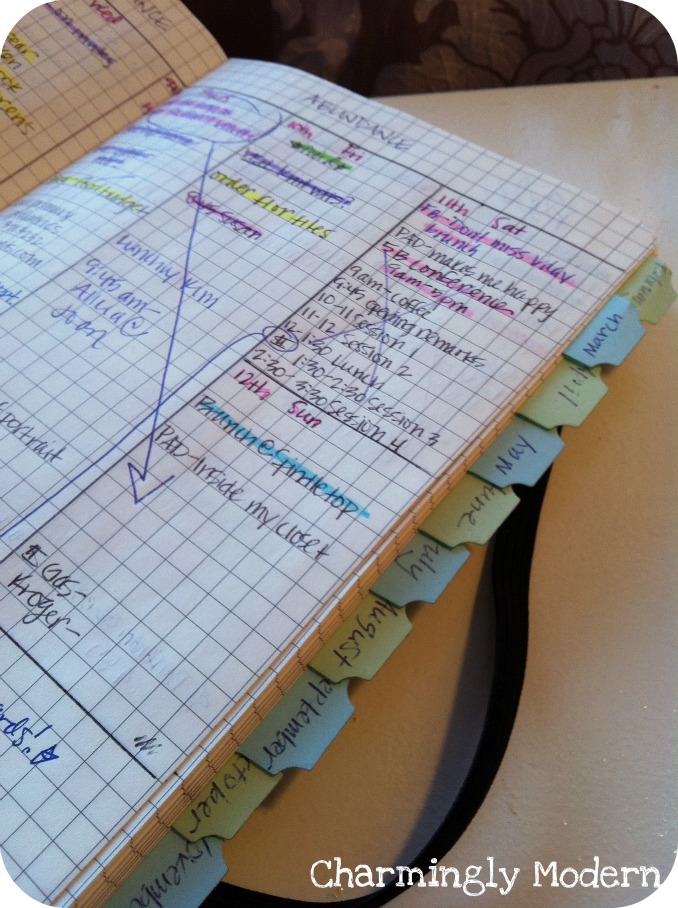
I used a small ruler and a black ballpoint pen to draw all the lines.
I purposefully left large gaps in the weekly pages at the start or end of each month, depending on what day of the week it ended or began on, so I would have space to write out important dates, monthly goals or anything else. I like to use this space as a bill tracker right now so I have the entire list of the month’s bills in one spot.
The bottom of the weekly pages is open for whatever notes I may need to make – weekly goals, contact information, blog stats, etc… What I record there changes week to week, depending on what’s going on that week!
After I had completed pages for the entire year, I had quite a bit left of the notebook so I could easily make blog planning pages. I used the same template I had created for my hand-bound planner because that worked for me last year. One page is devoted to planning out the month; it has 6 blocks total – 1 block for each week, plus an extra block for stats or whatever else. I began three rows down again, and each block is 12 cubes across by 12 cubes down. The facing page is open for notes, brainstorming, etc…
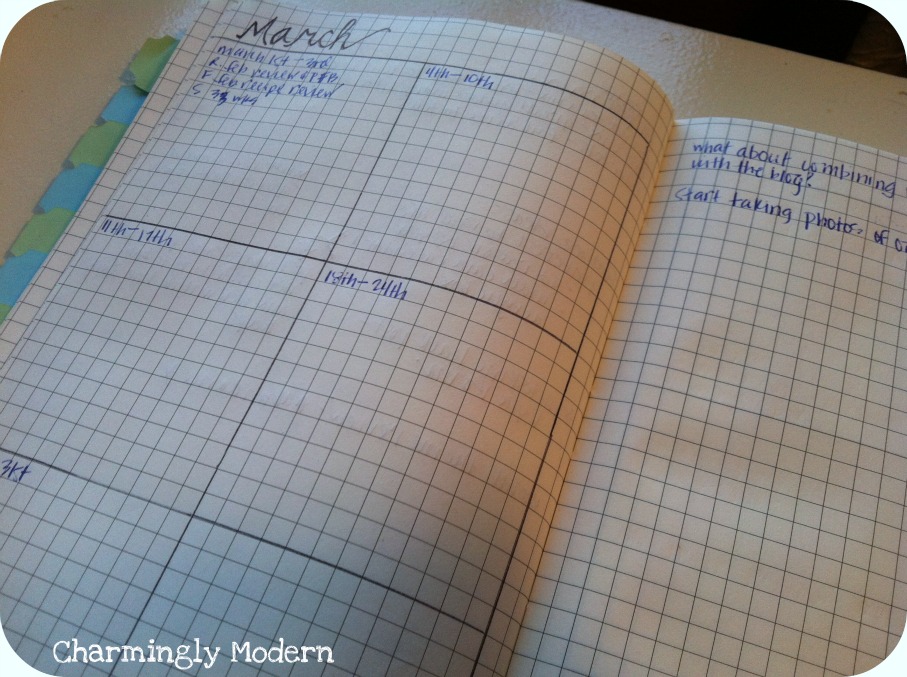
I still have a pretty large section of the notebook open which I’ll use for journaling, creating lists, making notes and so on. The notebook has a little pocket at the very back which is super nice, too! It’s perfect for business cards or stashing treasures.
I tabbed out the months using Martha Stewart’s Avery NoteTabs, which are available at Staples. I really love these tabs because the paper is thick and durable and you can easily remove them, too.
So, that’s my planner for this year! It’s working wonderfully so far. I actually kind of hate Moleskine notebooks so I was surprised that I am liking this one so well, but I think it helps that I’ve customized it because that makes it fun to use.
Have you found your perfect planner for 2012 or are you still searching?
Check out my other planners through these links –
Erin Condren Planner review
2013 Moleskine Planner
2013-2014 Plum Paper Planner
28 responses to “Moleskine notebook turned planner”
Thanks for the great idea and instructions. I too have been frustrated trying to find a planner that works for me and all my projects. I believe I can adapt your concept. I really appreciate the pictures as well. I’m a visual learner.
Are you still happy with this planner now that you’ve had several months to work with it? Have you made any adaptations or will you make some for next time/year?
No problem! Yes it is very frustrating trying to find the right planner.
Normally I abandon planners halfway through using them, but this one I am still using. I love it! Since I had so many free pages at the end I use those for journaling. I also added in a blog planning section.
Good luck making yours!
This is EXACTLY what I’ve been looking for! Thanks for being so detailed. I’m thinking of embellishing the cover with scrapbook paper or making a fabric cover I can reuse.
You’re welcome! Have fun creating it 🙂 I wanted to embellish mine too but never seem to find the time. Let me know if you end up doing something to the cover, I’d love to see it!
So, I found this cute bookmark (http://sharonrowanphotodesign.blogspot.com/2011/03/free-bookmark-download.html) and used tracer paper and metallic sharpies to transfer to the Moleskine. Worked beautifully! I don’t know how to post a pic here, but I’d love to send it to you. 🙂
Oh man I love the bookmark!!! I love foxes so that is right up my alley 🙂
Can you upload a pic to flickr? You can put a link to it if you upload it somewhere then I can see it!
Here goes. Had to make a Flickr account. Hope you like it! I love seeing it everyday. http://www.flickr.com/photos/87520759@N08/8007217054/in/photostream
Ahh! I love it!! I never even thought of drawing on the cover with sharpies. That’s a brilliant idea and I think I will borrow it.
Thank you for sharing it with me!!
Can you explain a little about the hightlighting you did in your planner. I see lots of pinks, blues, etc.
Yes! I have a color system so that, at a glance, I can see what types of things I’ve got going on. Pink is work-related. Blue is family/friends/church. Green is payday. Purple is personal. Yellow is errands/bills. Orange is meal planning. Thanks for the comment!
One more question. It appears like maybe you are recording expenses near the bottom of your Daily Journals. If that is not a correct assumption, do you record these somewhere?
Yes, I do record them there. I don’t keep receipts long term unless it’s an expensive transaction, so this is a handy way of keeping track of daily/weekly expenses. I got into the habit back when I worked at a bank four or five years ago. It also keeps me accountable because I tally them up at the end of the week so I can see how much I’m spending at places like, say, Starbucks 😉
[…] Erin Condren planner. I had seen so many bloggers talking about how amazing these planners were and my Moleskine notebook I’d turned into a planner for 2012 was just about done so I thought maybe this new thing would work for […]
What pens did you use? Everything except regular ball point pens bleed. Another blog suggest the Pilot Precise V5–ruined my page. Do your highlighters bleed? What brand of highlighter do you use?
I use the Pilot EasyTouch ballpoint pens – they’re a medium point and I haven’t experienced any bleed through with them. http://www.amazon.com/gp/product/B0058NN8HG/ref=oh_details_o06_s01_i00?ie=UTF8&psc=1
For highlighters, I use BIC.. There isn’t bleed through, but because the paper is so thin, you can sometimes see the color on the other side. I’ve also used highlighter pens to write over top of the Pilot ink. They’re fine point and don’t bleed through http://www.amazon.com/gp/product/B0058NN8HG/ref=oh_details_o06_s01_i00?ie=UTF8&psc=1
Good luck!
[…] on. At the same time I am always looking for the perfect one. This past year I ended up finding a ‘how-to’ for transforming a Moleskin squared notebook into a planner. I did really enjoy it but it was a bit […]
[…] the past, I’ve made moleskine notebook planners (see my 2012 planner, and my 2013 one too). I’ve also tried Erin Condren’s life planners and, while I […]
[…] 2012 Moleskine Notebook Planner Erin Condren Planner 2013-2014 Plum Paper Planner […]
[…] (duh, it’s my middle name. Rachael Organization G.). And when I saw this idea for a DIY Moleskine Planner! Mine is pretty much identical, except I am using my empty pages in a different manner…that I […]
[…] loved the look of them. Of all the blog posts about creating a planner from a Moleskine was from Charmingly Modern. I really liked her weekly layout. That was always the main section of a planner I could never […]
Thank you so much for your post. I am a DIY planner FREAK! For years, I’ve gone through several designs for my 5-1/2 x 8-1/2 3-ring binder planner and have always absolutely hated the bulkiness of the planner itself. I’ve tried plastic coil bindings from office supply stores but was not happy about the lack of covers, page finders, etc. I’ve always loved Moleskines but could never adapt it just right…..until I found your blog. Thank you, thank you, thank you!! I thought I was going crazy with so many design changes. Now, I have mental peace, thanks to you! I’ve added a quiver pen holder that also saves me time looking for pens, pencils, highlighters. http://www.quiverglobal.com It is a nice added touch I thought I’d share.
[…] did my research and I really loved this tutorial by Amanda at Charmingly Modern. She turns a Moleskin squared notebook into a planner. I also love […]
[…] HERE) but again not everything I wanted in one place. Not too long ago, I found a pin (and this one) about turning a Moleskine journal into a calendar. You had me at Moleskine. You see, those are my […]
Speaking as a 69-year- old, I’m curious why are you young people using pen and paper instead of your smart phones?
I’ve never liked using my phone as my planner. I’ve always been into paper, planners, etc… I will never *not* have a paper planner, I think!
Thank you, Moxiemanda. Although I’m not tech savvy, I have learned to email. Nonetheless, I still enjoy putting pen to paper to make lists and to correspond with a few old friends. I was curious to know if I was the only one. Kathy
You definitely aren’t the only one, Kathy! 🙂
[…] Erin Condren planner. I had seen so many bloggers talking about how amazing these planners were and my Moleskine notebook I’d turned into a planner for 2012 was just about done so I thought maybe this new thing would work for […]

Leave a Reply